Every business needs a website. But for those of you who have never created a website before, this can seem a bit intimidating.
It doesn’t matter if you’re just launching a new startup company, if you’ve been in business for a decade, or fall somewhere in between. You need to have a website to increase your reach and establish a digital presence.
Ultimately, your website will serve as the center or hub of everything that you do.
It’s a place people can find basic information about your company, such as your location, phone number, and email address. All of your campaigns should be driving traffic to your website. If you’re going to sell products and services online, your website will facilitate those transactions.
But before we get ahead of ourselves and into all that, it’s time to get back to the basics: How do you build your own website?
There are tons of different website builders out there, but Wix is definitely a top option to consider. (It’s our top pick for best website builder for automating the tough decisions.)
I like Wix because it’s very easy to use. Someone who has never created a website before can get a site up and running in no time at all. Even if you have some experience building websites, you can use Wix as an alternative option to simplify what you’ve done in the past.
Plus, Wix gives you hundreds of templates, pages, and web hosting services for free. You’ll eventually want to upgrade to one of their premium plans, which are very affordable, but we’ll talk about that in greater detail later on.
Even though it’s easy to make a Wix website, you can still cut some of the trial and error out by using this step-by-step guide as a reference.
Let’s dive right in.
Step 1: Create an account
Like almost anything else you do online, the first thing you need to do is set up your account. It’s really simple, and should only take you a few seconds.
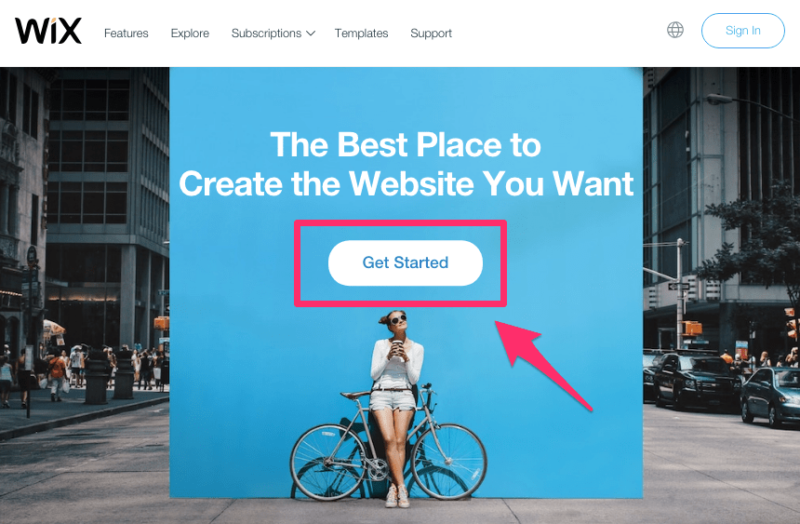
From the Wix homepage, just click on the “get started” CTA in the center of the screen.
If you’ve been doing research and find yourself on another one of the Wix pages, you can still get started without having to navigate back to the homepage. Just look for the CTA, which might be worded slightly differently depending on the content that you’re looking at. For example, from the “Explore” page you’ll want to click “Create Yours Today” to move forward.
It should be pretty self-explanatory, but if you’re struggling, you can always go back to the homepage, or just click here to create your account.
Unlike other platforms that ask for nearly everything but a blood sample to sign up, Wix asks for just two things.
- email address
- password
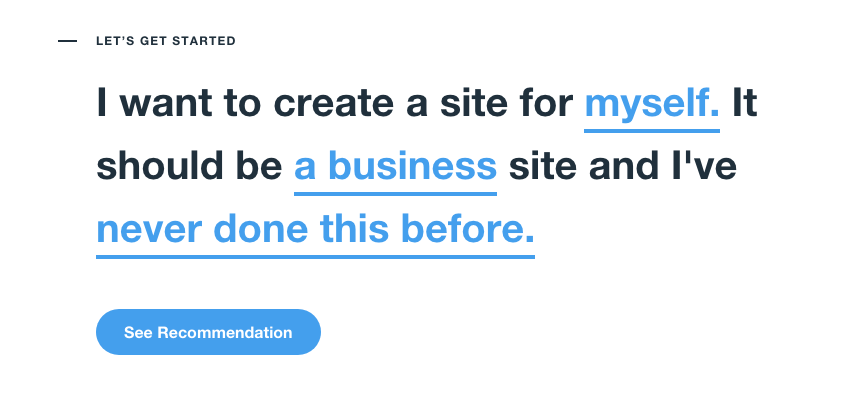
It’s optional, but they’ll ask you some follow up questions as well to help you create exactly what site you’re looking for. Answering these questions will help Wix’s ADI builder help you create a site you like faster.
Who are you creating a Wix site for?
- yourself
- a client
- company you work for
- someone else
What type of site Wix site are you building?
- business
- online store
- music
- designer
- blog
- portfolio
- events
- photography
- restaurants and food
- accommodation
- beauty and wellness
What is your level of expertise building websites?
- built sites professionally
- created many websites
- made a few websites
- never done this before
Here’s an example of what this might look like for you, depending on the options that you’ve selected above.
From here you’ll have two options.
You can allow the Wix ADI to create a website for you. All you need to do is answer some questions, and it’ll make a site for you in just a few minutes, complete with custom text and images. It’s almost magical how good it is — you should definitely try it out.
Alternatively, you can use the Wix Editor to make a website on your own. For our learning purposes today, this is the route that I’ll go with.
Step 2: Choose a template
Wix offers hundreds of standard templates at no charge. You can search for a template based on category. For example, let’s say you want to create a Wix business website. Some popular categories include:
- automotive & cars
- advertising & marketing
- consulting & coaching
- finance & law
- pets & animals
- real estate
- services & maintenance
- technology & apps
All of the template options are located on the left side of the dashboard. Take some time to scroll through and find one that fits best for the type of website you want to build.

Check out the first template on this page. It’s a “Coming Soon” landing page. Even if your website isn’t built just yet, it’s important to least start off with this type of landing page. For startup companies, creating a website may be the first thing you do, even before you actually register your business name or create an LLC. Wix understands this, which is why they give you this option.
Alternatively, you can select a blank template and build your own from scratch. While this is definitely something you can consider, I recommend going with one of the pre-designed templates. This will make your life much easier in the long run, especially if you’ve never built a Wix website before. If you’re up for a challenge and want to be a bit more unique, go ahead and give the blank template a try.
When you hover your cursor over each template, it will tell you if it’s free or if you have to pay. Once you find a template that you like, just click “edit” to continue.
Step 3: Save your work
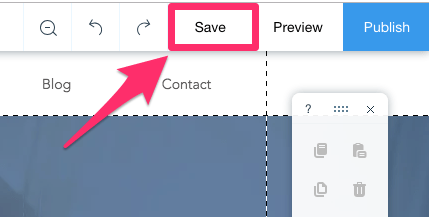
It’s not a huge deal, but unfortunately, Wix’s autosave feature doesn’t turn on until you manually save for the first time. So before we make any changes at all, let’s manually save the page.
The “save” button is located at the top right corner of the screen.
Be forewarned: If you leave the Wix Editor and make changes in Wix Code, which is more advanced and not recommended for beginners, there is no autosave function. There’s also no autosave function for contributors.
Step 4: Edit your site
After you select a template, you’ll be brought to the Wix Editor.
Basically, this is what your website will look like if you decide to publish it right now. It’s up to you to make the necessary changes to make the website your own.
Here’s a basic look at what you’ll see when you’re editing the content on your future site:
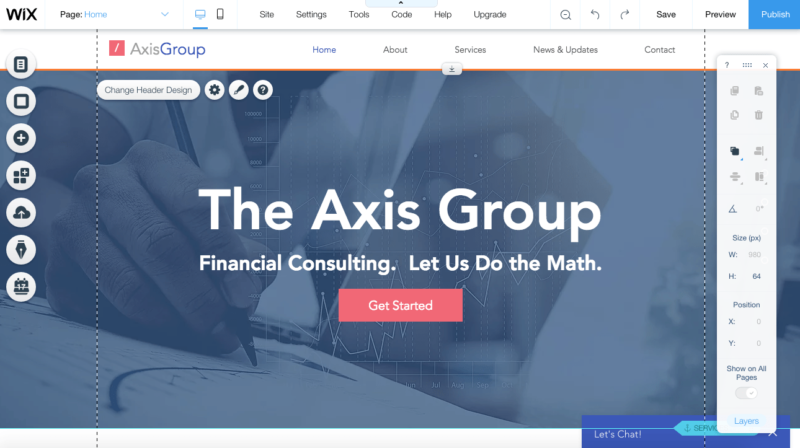
Anything can be changed just by clicking on it. Start with the basics, like replacing the template company with the name of your actual business.
For our purposes, let’s just say I am redesigning the Quick Sprout homepage with Wix.
In less than one minute, look at what I was able to accomplish.
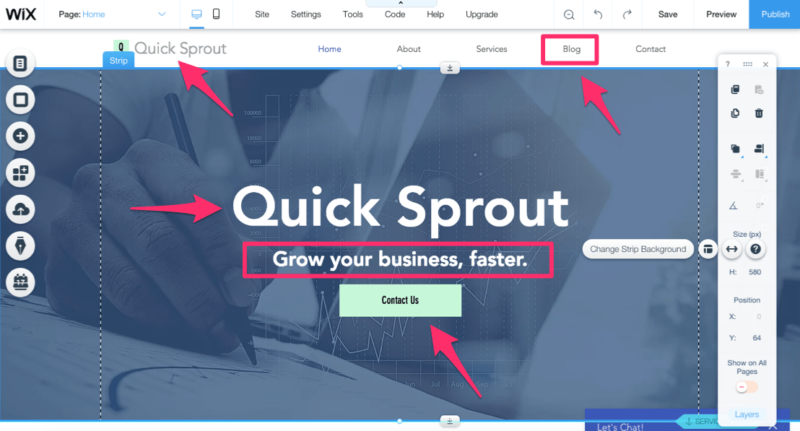
I replaced the Axis Group with Quick Sprout on the center of the page, as well as the in the top left corner of the menu bar. I also swapped out the dash on a red background with the letter “Q” on a green background in the left corner of the menu bar.
The financial consulting texted was changed to “Grow your business, faster.” You can also see that I changed the red “get started” CTA to a green “contact us” CTA.
Look at the menu options at the top of the screen as well. The original template had a “news and updates” page. I clicked on that and changed it to “blog” because that makes more sense for the site that I’m building.
Again, I made all of these changes in less than a minute. All you have to do is click on what you want to change, and follow the instructions on the screen. It’s that simple.
You can replace images when any custom photos you’ve taken for your website. Or you can refer to our guide on the best places to get website images (paid and free).
It’s easy to drag and resize any of the content on each page, too. The Wix Editor allows complete customization based on your personal preferences.
Step 5: Optimize your site for mobile devices
The mobile version of your website should not look the same as the desktop version. Part of having a good website means that it needs to be easily accessible from smartphones and tablets.
If you don’t have a good mobile site, you could lose more than half your customers: more than 52% of all Internet traffic comes from mobile devices.
Fortunately, Wix makes it easy to optimize your web design for mobile users. Just click on the mobile icon at the top of the screen to switch between desktop view and mobile editing.
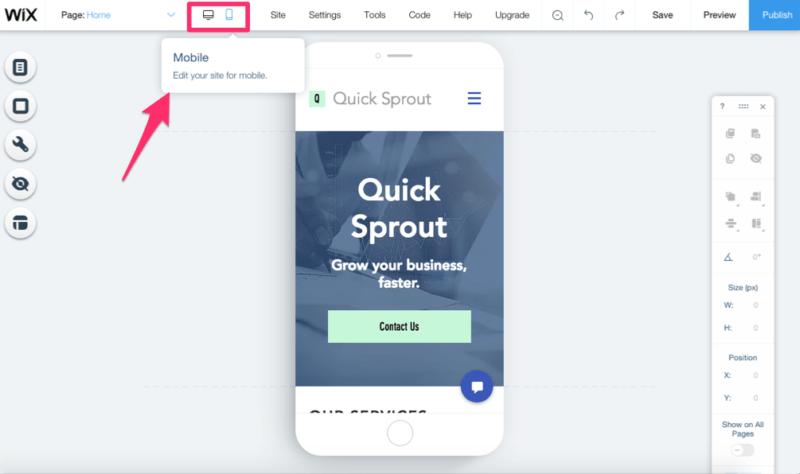
Wix does a great job of changing the content for you, so it’s automatically optimized. However, you may want to manually make some changes on your own. The changes you make here won’t impact the desktop version of your site.
Before your site goes live, make sure you go through the mobile version of each page to ensure that’s it’s properly optimized to your liking.
Step 6: Connect your domain
Before you can publish your site and have it go live, you’ll need to connect your domain name.
The easiest way to do this is from the dashboard. Just click “Connect Domain” to proceed.
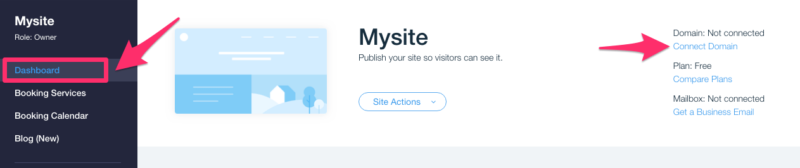
By default, your website domain will be: yourusername.wixsite.com/mysite
You’ll have the option to change the “my site” portion of that domain for free. But, that’s definitely not how you want your site domain to look.
When was the last time you went to a legitimate and credible site that had all of that extra stuff, including the website builder in the domain name? It’s not a good look for your business.
Wix gives you the option to buy a domain name directly from their platform or connect a domain name that you already own. I recommend not buying your domain from Wix, but at a place that specializes in domain names, and putting a lot of thought into get the right domain. If you haven’t done this yet, refer to our recent guide on how to buy a domain name.
Wix lets you create a website for free, but you’ll eventually want to upgrade to a premium account. This is when (and why) you want to do that. Without paying for a premium account, you’ll be stuck with the “wixsite” in your domain name.
Packages start at $11 per month, but if you’re using this site for business purposes, you’ll want to pay more than that. Even Wix’s most expensive business plan is just $35 per month. It comes with features such as:
- accept online payments
- unlimited bandwidth
- connect your custom domain
- free domain for one year
- 50 GB of storage
- $300 ad vouchers
So review all of the premium plans to find the one that’s best for you. Depending on what you select, it will only cost you between $132 and $420 per year. That’s pennies considering how much money you can make with a website.
Conclusion
It’s that simple. You’ve learned how to make a Wix website.
There’s not much to it — just six easy steps.
Once you go through everything outlined above, all you need to do is publish your Wix website, and it will be live on the Internet for everyone to see.
To recap, create a Wix website for the first time by following these simple instructions:
- Create an account
- Choose a template
- Save your work
- Edit your site
- Optimize for mobile devices
- Connect your domain
That’s it.
Once you complete the steps, you can publish your site and start generating leads, driving traffic, and selling products online. Your opportunities are endless.
What type of business or brand page are you going to build on a Wix website?
No comments:
Post a Comment